Pages

Thursday, December 30, 2010

I am still here...


Hi everyone! I just wanted to apologize for the lack of postings in the past few weeks... I try to get at least one recipe posted per week, but it has not happened recently...
Just wanted to say that I still am alive (haha!) and that I am working on a few recipes to post here. So, stay tuned!
Until then, have a happy holiday season, and may the new year bring lots of happiness, health, and love!


Yours truly,


Lulu.

Saturday, December 11, 2010

Easy Double Chocolate Vanilla Cupcake


Oh, what a joy it is to see a happy child enjoy a birthday treat! This week, the son of one of the dentists I work with had his ninth birthday. When I asked the parent what her son would like for his birthday cupcake, she simply said: he loves vanilla and chocolate! I thought BINGO! Simple vanilla cupcake with chocolate frosting would be a perfect combination. However, I did want to add a fun surprise to the cupcake, and so I decided to fill it with chocolate pudding. Result? This is the note I got on my desk later that afternoon:


Isn’t this sweet? J

How easy was this cupcake recipe? SUPER EASY!!! I did resort to boxed cake mix, but I added my flair to it, thanks to the recipe recommendations in Hello, Cupcake!: Irresistibly Playful Creations Anyone Can Make. If you are ever in a pinch to make cupcakes, it is good to have a cake mix in your pantry (I always have at least one vanilla and one chocolate). Both the cupcake and frosting recipes are from there. The frosting recipe is the same as my Mint Chocolate Cupcake recipe, so just follow the recipe posted there.

I do want to focus on how to fill the cupcake though. Choose a smooth filling (any type of pudding, or even frosting). Here are some ideas of filling recipes from Wilton. Whatever filling you choose, I use a piping bag with the 230 Wilton round tip inserted (no coupler needed).
 Fill the bag with the chosen filling, then poke the center of the cupcake with the tip, and squeeze! I make sure to go at least half way deep into the cupcake (even 2/3 deep) so that when you start squeezing, the filling stays more in the center and not just at the top. When the top of the cupcake starts to crack a little because it is expanding, then stop. Once you fill all your cupcakes, you can frost the top of it with your chosen frosting and hide the hole you have created. No one will know, and when they take a bite of the cupcake, they will be pleasantly surprised with the yummy goodness they have just encountered! Happy eatings!

Monday, December 6, 2010

Cherry Cordial Cupcake


Happy greetings everyone! Hope all the tryptophan-induced comas are gone and everyone is working towards the next holiday :) 
Here is one of my latest cupcake adventures. One of the doctors I work with happens to L-O-V-E cherry cordial candies! That nice combination of chocolate and cherries is just to die for... So, I thought I could try my hand at replicating this little piece of heaven in cupcake form. The result? Something A-mazing! Well, and by replicating, I mean sticking a frozen cherry cordial into a nice and moist cupcake prior to baking, and voila! The resulting cupcake came out wonderfully: moist chocolaty cupcake that had an added moistness bonus from the cordial itself. I only froze my candies for about 10 minutes, but I think next time I will try to freeze them for longer (maybe 30 minutes or so?) and hope the candy stays whole during the baking process. If it seems that the cherry cordial chocolate shell did melt during baking, then let the cupcake cool completely before eating, so that the chocolate has a little bit of time to harden again.
So onto the recipe: the chocolate cupcake batter is the same from my  chocolate mint cupcake, just without the mint chips. The frosting is an invention of mine that turned out pretty good! Hope you enjoy these yummies!


Cherry Cordial Cupcakes - serves 20-22 cupcakes


Ingredients:
1 3/4 cups AP flour
1/4 cup unsweetened cocoa powder
3/4 tsp baking soda
1/2 tsp baking powder
1/2 tsp salt
1 1/2 sticks (12 Tbsp) unsalted butter, softened
3/4 cup lightly packed brown sugar
2 large eggs
2 oz unsweetened chocolate, melted
1 cup buttermilk
1 tsp vanilla extract
20-22 Cherry cordial candies, frozen


Directions:
1. Preheat the oven to 350F. Line the muffin cups with paper lines.
2. Whisk together the flour, cocoa powder, baking soda, baking powder, and salt in a medium bowl. in another medium bowl, with an electric mixer on high, beat the butter and sugar until light and fluffy, about 3 minutes.
3. Add the eggs, one at a time, beating well after each addition. Beat in the melted chocolate. Beat in the vanilla. Reduce the speed to low and add the flour mixture alternately with the buttermilk in batches, beginning and ending with the flour mixture and beating just until blended. 
4. Fill the paper liners 1/2 full. Place one cherry cordial candy into each filled liner until the candy is completely submerged. Bake until a toothpick inserted in the center comes out clean 15-20 minutes. Remove the cupcakes from the baking pan, place on a wire rack, and allow to cool completely.


Cherry Buttercream Frosting


Ingredients:
2 sticks (16 Tbsp) butter, softened
1 tsp vanilla extract
10-15 Maraschino cherries, finely chopped
2 Tbsp liquid from Maraschino cherries
1 Tbsp heavy cream
3.5-4 cups powdered sugar


Directions:
With an electric mixer with the whisk attachment, beat the butter until soft and smooth, about 3 minutes. Add vanilla extract, liquid from cherries, and heavy cream into butter and beat until well blended. Start to add powdered sugar and mix after everyone cup or so of measurement. If the buttercream has too much of a stiff consistency, add a little more heavy cream, and if it is too runny, add more powdered sugar.

Originally adapted from: Hello, Cupcake!: Irresistibly Playful Creations Anyone Can Make

Sunday, November 28, 2010

POM-a Wonderful Party!


Greetings everyone!  The amazing people at POM Wonderful have sent me great party supplies to make a pomegranate themed dinner party. Awesome, huh? When given this opportunity, I knew I wanted to throw a birthday dinner party for my dear husband. It was the perfect occasion!
But hmm… I had never really worked with pomegranate, never had pure pomegranate juice…  The only time I really paid enough attention to it was when I saw an episode about pomegranates on “Good Eats” by Alton Brown. So, with so little experience in dealing with pomegranates, I knew I had to do my homework before I committed to my menu.
I visited POM Wonderful’s website and learned from there how to open and extract the arils efficiently.  Here is POM’s easy step-by-step way to open a pomegranate:

Cut – With a sharp paring knife, cut off the top about a half inch below the crown.

Score – Once the top has been removed, four to six sections of the pomegranate divided by white membrane will be visible. With the knife’s point, score the skin along each section.

Open – Using both hands, carefully pull the pomegranate apart, breaking it into smaller sections.

Loosen – Over a bowl of water, loosen the arils and allow them to drop freely into the bowl. The arils will sink to the bottom of the bowl and the membrane will float to the top.

Scoop – Use a spoon to scoop out the pieces of white membrane that have floated to the top of the water.

Strain – Pour the arils and remaining liquid through a strainer.

Haha, no, this is not what I got from POM :) Although she certainly loved the juice and the box!

Well, that seemed easy enough! I tried it, and actually had some good fun separating the arils off of the fruit (but my kitchen looked like a horror movie…). I tried an aril (I personally did not eat the whole thing; I spit the seed out but I know of people who choose to eat the whole thing!) and it was tart and sweet at the same time. Very flavorful! If you like the taste of cranberries, it is a fruit you would really like!
Now knowing the taste of the fruit, I was able to choose the menu.


For starters, I made an appetizer of Hummus drizzled with pomegranate molasses (I found pomegranate molasses at our local international food store), served with assorted chips (pita chips, pretzel sticks, mini toasts).The hummus recipe (which is sooooooooooooo easy to make!) was from one of my favorite blogs, Annie’s Eats, inspired from Cook’s Illustrated. To go along with the wonderful appetizer, we made (and by we, I mean my husband since he is the drink “connoisseur”) a POM-tini. He modified the original recipe from Drinks Mixer a little bit in the drink presentation. Following is the modified recipe:

Ingredients:
2 oz of citron-flavored vodka
1 oz Cointreau orange liqueur
Lemon slices for garnishing martini glass
Sugar for garnishing martini glass

Directions:
Mix first 3 ingredients in a shaker. Rub one lemon slice along each martini glass rim, then dip the glass upside-down on sugar. Add the mixed contents into the garnished glass and serve. Serves 2 glasses.


 For the main course, I made Pomegranate Lamb with Au Jus, with a side of Sweet Potato, Apple and Onion Gratin and Roasted Asparagus. Now I have to say something about the Pomegranate Lamb: the Au Jus part of this recipe is what makes the whole dish! It takes some time to reduce the chicken stock, but it is worth it! The sweetness of the pomegranate juice really complements the marinated lamb meat. The meat itself comes out so tender and moist! For this party I doubled the recipe, and people devoured all the food!

For dessert, I made a simple Vanilla Cupcake with Pomegranate Frosting. The frosting was my creation, and it is below as well. ThPOM juice added a slight pink/tan color to the frosting, which was a nice touch!

POM Wonderful’s Buttercream Frosting
2 sticks butter unsalted butter, softened
1 tsp vanilla
4 cups confectioner’s sugar
1 Tbsp meringue powder
pinch of salt
1/4 cup 
POM Wonderful Pomegranate Juice 

Happy Birthday to my lovely husband. Thanks for letting me share this wonderful day with you! I love you very much!

Credit goes to all the wonderful inspirational recipes I followed:
The POM-tini is adapted from Drinks Mixer, the Pomegranate Lamb is a recipe from Foodnetwork.com, the Sweet Potato side is from the great blog Evil Shenanigans, and the Hummus and Vanilla Cupcakes are from Annie’s Eats.

Tuesday, November 2, 2010

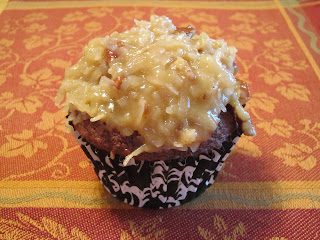
German Chocolate Cupcake


Hello again! So for the dessert: this yummy dessert deserved its own blog! As I had mentioned before, my father-in-law’s favorite dessert is German Chocolate Cake. Did you know German Chocolate Cake is not really German? It is an oh-so-very American cake! If you are interested in learning a little about this cake’s history, check out  Wikipedia.
Anyways, I didn’t want to bake one big cake, so I made cupcakes instead! This recipe was amazing! I didn’t change anything from its original recipe, and I must say it came out super moist and fluffy! I highly recommend it! :D So what are you still here reading this blog? Go make these cupcakes!

German Chocolate Cupcakes
Adapted from 
Martha Stewart's Cupcakes
Makes 24 cupcakes

Chocolate Cupcakes
3/4 cup (1 1/2 sticks) unsalted butter, room temperature, plus more for tins
2 cups cake flour (not self-rising), sifted, plus more for tins
1 teaspoon baking soda
3/4 teaspoon salt
1 1/3 cups sugar
3 large eggs, room temperature
1 1/2 teaspoons pure vanilla extract
1 cup buttermilk
5 ounces semisweet chocolate, melted and cooled

1. Preheat oven to 350 degrees. Brush standard muffin tins with butter; dust with cake flour, tapping out excess, or spray generously with nonstick baking spray. Whisk together cake flour, baking soda, and salt.

2. With an electric mixer on medium-high speed, cream butter and sugar until pale and fluffy. Add eggs, one at a time, beating until each is incorporated, scraping down sides of bowl as needed. Beat in vanilla. Reduce speed to low. Add flour mixture in three batches, alternating with two additions of buttermilk, and beating until combined after each. Beat in chocolate until combined.

3. Divide batter evenly among prepared cups, filling each three-quarters full. Bake, rotating tins halfway through, until a cake tester inserted in centers comes out clean, 20 minutes. Transfer tins to wire racks to cool 10 minutes. Run a small offset spatula or knife around the edges to loosen; turn out cupcakes onto racks and let cool completely. Cupcakes can be stored up to 3 days at room temperature in airtight containers.

4. To finish, make a hole in the top of each cupcake with a spoon or wide end of metal decorative icing tip. Fill hole with frosting and spread more on top.

Coconut Pecan Frosting
3 large egg yolks
1 can (12 ounces) evaporated milk
1 1/4 cups packed light-brown sugar
1 1/2 sticks (12 tablespoons) unsalted butter, cut into small pieces and brought to room temperature
1 teaspoon pure vanilla extract
1/4 teaspoon salt
2 2/3 cups (7 ounces) sweetened flaked coconut
1 1/2 cups (6 ounces) pecans, toasted and coarsely chopped

1. Combine egg yolks, evaporated milk, and brown sugar in a saucepan. Add butter, and cook over medium heat, stirring constantly, until thick, about 10 minutes. Pour through a fine sieve into a bowl.

2. Stir in vanilla, salt, coconut, and pecans. Let cool completely. Frosting can be refrigerated in an airtight container for up to 1 day; bring to room temperature before using.

Recipe provided by Playing House

Monday, November 1, 2010

Stuffed Pumpkin


Happy Halloween (a day late) everyone! Man, we had a great trick-or-treat night in our neighborhood. Lots of kids came through our house with some pretty ingenious costumes! My favorite was these 2 teenage girls who were “Siamese twins” – they each were a pant leg and wore a very large dress. They were walking around the neighborhood like that the ENTIRE night! It looked so hard to walk with your legs bound by a pant leg, and only having one dress sleeve to stick your arms through. They got extra candy from me just for the costume originality!
Anywho, Sunday was also my daughter’s first go at trick-or-treating. Last year she was just over 3 months, so although we dressed her up, she didn’t quite participate in any of the festivities. This year she actually went trick-or-treating to a few houses, and even got to hand out candy (when she wasn’t keeping the bright-colored candy to herself).
Another also, since today is my father-in-law’s birthday, we invited them over for dinner yesterday and celebrated his birthday a day early. When I asked his girlfriend what his favorite dessert is, without hesitating she said “German Chocolate Cake”. I jumped at the opportunity to turn this yummy dessert into a cupcake. I will post the cupcake recipe separately here, so I can focus on the dinner recipe.
So actually focus on the dinner: Stuffed pumpkin. This is as “autumn-like” as you can get in a meal! The stuffing was very similar to a Thanksgiving dressing. Truthfully, you can add anything you think would sound good in your stuffing. Since my guests were vegetarian, I stayed away from any meats, but adding ground sausage would be really yummy. My husband even suggested apple sausage (and I said “awesome!”). If you like the sweet and salty combination, green apples would go really well too (which I plan on adding next time). Aside from these extra yummies for the stuffing, I will also be adding more chicken broth to the pumpkin to make the stuffing moister. I think it would also help cook the pumpkin more tender.
NOTE: since I didn’t get a picture of the stuffed pumpkin itself, here are pictures of my daughter, one from last Halloween, and one from yesterday:


Stuffed Pumpkin

 Ingredients:
1 (5-6lb) pumpkin (I used pie pumpkin)
3 Tbsp of canola oil, plus more for brushing on pumpkin
6 celery stalks, diced
1 medium leek, diced
3 cloves garlic, minced
2 cups mushroom, cubed
2 cups cooked rice (I used white)
1 package dried bread (for stuffing), or 6 cups of cubed bread
1 cup dried cranberries or currants
1 cup walnuts, coarsely chopped
1 Tbsp dried sage
1 Tbsp poultry seasoning
2-3 cups chicken stock
2 Tbsp butter, melted
2 eggs, slightly beaten
Salt and ground pepper to taste

Directions:
Remove top from pumpkin, jack-o-lantern style. Scoop out seeds and strings, leaving hollowed shell to stuff. Brush canola oil lightly on pumpkin skin if you like, and set aside.
Heat 3 Tbsp of canola oil in large skillet and sauté celery and leek until starting to be translucent. Add garlic and continue cooking. Next add the mushrooms and sauté until done, about 5 minutes. Add white rice, cranberries or currants, and stir to mix. Add coarsely chopped walnuts to the mixture.
Add seasonings, butter, and eggs. Mix everything together, preferably with your hands (don’t be shy to get your hands dirty!). Add more chicken stock or eggs if you like a moister stuffing; skip the eggs or use less stock if you like a drier one. Stuff into pumpkin and bake at 350F degrees for about 1.5 hours, until stuffing is heated through to the center and pumpkin is fork tender.

Recipe adapted from Foodista.com


Friday, October 22, 2010

Pumpkin Spice Cupcake with Cream Cheese Frosting


Another wonderful co-worker’s birthday was this past Thursday. At the beginning of this year, she was diagnosed with breast cancer. The amount of strength this woman has is amazing! She continued to come to work without stop, always with a smile on her face and never letting us “baby” her. So this birthday celebration was an extra special one in my book. To celebrate our lovely Cheryl’s birthday and the month of October, being Breast Cancer Awareness Month, I gave the cupcake a little pink touch.  Cheryl had requested a pumpkin cupcake, and I thought that a nice cream cheese frosting would go well with it. To give the cupcakes the pink look, I added streaks of pink coloring gel to the piping bag (the same technique I used for my 4th of July cupcakes), which gave the frosting a nice rose-like look, if I may say so myself. J

Pumpkin Cupcake
Ingredients:
1 package (18.25oz) spice cake mix
1 can (15oz) solid-pack pumpkin puree
4 eggs, at room temperature
½ cup butter, softened at room temperature
½ cup buttermilk, at room temperature

Directions:
Preheat oven to 350F degrees. Line 2 regular-sized muffin pans (24 cupcakes total) with cupcake liners. In a large bowl, beat the cake mix, pumpkin puree, eggs, butter, and buttermilk on low speed for 30 seconds until well blended. Then beat on high speed for 2 minutes. Fill each cupcake liner with batter 2/3 way full. Bake in pre-heated oven for 12-15 minutes until done. To check for doneness, insert a toothpick in the middle of the cupcake. If the toothpick comes out clean, the cupcakes are done!

Cream cheese frosting
Ingredients:
8 oz. cream cheese
8 tbsp. unsalted butter, at room temperature (1 stick)
2 tsp. clear vanilla extract
1-2 tbsp heavy cream
3½-4 cups confectioners’ sugar, sifted
Pink gel for piping bag

Directions:
Combine the cream cheese and butter in the bowl of an electric mixer.  Beat on medium-high speed until well combined and smooth, about 2-3 minutes.  Mix in the vanilla extract.  Gradually beat in the confectioners’ sugar until totally incorporated, increase the speed and then beat until smooth.  Frost cooled cupcakes as desired.


Adapted from Fall Baking Cookbook, Taste of Home 2010.

Monday, October 18, 2010

Spiced Cupcakes with Caramel Buttercream Frosting


Boy, this week has barely started and I just know it will be a busy one! But busy can be good, as long as we have a game plan and we are striving forward. J
So my tasks this week are not one, but 2 co-worker birthdays! Also, I am taking a new cupcake decorating class, with fall as the theme! The class is on Thursday, and so stay tuned for posts to come. Needless to say I am in baking heaven! The first birthday request is for our “Lil’ Mama” at work who will be 51 years young tomorrow! Her request was a simple spice cake with the caramel frosting I made with my Butter Pecan Cupcakes. I did change a couple of things in the frosting recipe though: I had 1 cup of butter-flavored shortening in hand so I used that instead of the butter. One note about shortening, after using it in mWilton decorating class, I have found that it lets the frosting hold its shape better than butter. Since butter is more temperature sensitive, for you to get the best results with a detailed decoration, you have to place it in the fridge, but that is not the case with shortening. Also, added the caramel topping at the end of everything, after I already mixed in the milk and the powdered sugar alternatively. The recipe below reflects my changes.
So for the cupcake itself, I followed the recipe that the book Hello, Cupcake! has on “semi-homemade” cupcakes. It is basically utilizing a boxed cake mix, and add a few ingredients to make it more homemade-like. So if you are ever looking for a quick way to make cupcakes, but adding an extra-special touch, then here is the recipe you should try (a regular yellow boxed cake will also work). Enjoy!

Spiced Cupcakes with Caramel Buttercream frosting
Makes 24 cupcakes

Ingredients:
4 eggs, at room temperature
1 cup of buttermilk
1/3 cup vegetable oil (the same amount of oil recommended by the box recipe)
1 box (18.25oz) of spiced cake mix

Directions:
Preheat oven to 350F degrees. Line two 12-muffin pans with cupcake liners. Beat all eggs in a mixing bowl. Add the buttermilk and oil into the eggs and beat until well mixed. Add the contents of the boxed cake mix into the wet ingredients and mix for at least 2 minutes. Scoop ~1.5 Tbsp of batter into each cupcake liner, and bake the cupcakes for 15-20 minutes until a toothpick comes out clean.

Caramel Buttercream Frosting

Ingredients:
1 cup butter-flavored shortening
1.5 tsp vanilla extract
1/8 tsp salt
1 ½ cup powdered sugar
1-2 Tbsp milk
¼ cup caramel topping (I used Smucker’s Caramel Flavored Topping)

Directions:
Beat first three ingredients at medium speed with an electric mixer until creamy.
Gradually add powdered sugar alternately with 1 Tbsp. (1Tbsp = 3 tsp) milk, beating at low speed until blended and smooth after each addition. Beat in up to 2 Tbsp. additional milk for desired consistency. Finally add the caramel topping, and mix unitl just barely blended.

Monday, October 11, 2010

Wilton Cake Decorating Class


Hi everyone! It's a me, Lulu! <-- a la Mario from Mario Brothers :)
Haha just thought I'd be silly there for a little bit. Moment of silliness is now over.
Anywho, I wanted to share with you my experience with the cake decorating class I took through the month of September. I have always liked the detailed work of decorating a cake. Growing up, my mom would actually be the baker (as I could not make the cake rise properly for the life of me!), but I would put the final touches with the decoration. Growing up in Brazil, cakes there are usually frosted with whipped heavy cream (chantili in Portuguese). Whipped cream is very temperature sensitive, and even a little heat from your own hands transferred onto the piping bag can melt the cream into liquid! So I remember sitting in the chilly garage during the winter to decorate the cake properly :P
During those times, I got to start enjoying the small decorative tips, and all the different shapes they can create. Knowing this, my husband gave me Wilton 2104-7778 Master Tip Set for Valentine's Day this past year, and I started experimenting with all the other tips (I had no clue on what most of the tips did!). I got a little frustrated not really understanding how to use these said tips. Around July I went to our local Hobby Lobby and saw a sign for cake decorating class. I thought: Perfect! I signed up for it, got all necessary supplies, and even had first day of class butterflies! There were 4 classes total, once a week for 4 weeks, and each class was 2 hours long. Here is a little run down on each of those classes:


First class: introduction, buttercream making demo.
We didn't really do much during this class, other than being shown how to make Wilton's buttercream frosting recipe (which btw it helped see what they mean by different consistencies! -- I might do a demo of buttercream consistencies as a separate blog sometime). Also we got tips on how to bake and level a cake. Our homework was to bring a leveled cake to decorate at the next class.


Second class:  first cake decorating!
We learned how to use the star and the round tips. You can make stars, shells, and zig-zag lines with the star tip; and balloons, lines, dots, and much more with the round tip. Here is the finalized cake of this class - it was one of my co-working dentist's son's birthday that next day, it was the perfect reason!


Third class: cupcake decorating!
To change things up a bit, our instructor told us to bring in cupcakes instead of a whole cake to decorate. I was so pumped! I went all out and instead of just making plain vanilla cupcakes, I made coconut-pecan cupcakes (recipe at a later date) and flavored the frosting recipe with almond extract (it turned out pretty good, if I may say so myself!)
We learned the drop flower, star flower, shaggy mum, little roses, and leaves! It was really neat to make so many different flowers in one class. Here are the final decorations:

Me finishing my homework :)

Fourth class: final class!
For our final class, the instructor told us to bring a baked cake and a thought-out cake decorating theme. Man, this took me a little while to decide. I wanted it to be special, but unique... I tend to overthink things sometimes (ok, a little more than sometimes...). Guess when I finally decided on what to do: on the drive to the final class!

So with fall being my favorite season, I thought that should be enough of reason for a fall-themed cake. The cake itself was a pumpkin-pecan cake, and although I would have personally preferred the recommended cream cheese icing, I had to use the Wilton's buttercream to have the consistency for decorating. Here are the pictures of that final project:


Me with my final project and my certificate of completion!

My final thoughts on this class: it was so much fun, I learned a lot and can't wait to take the other classes available (flowers, and fondant!)

Sunday, October 3, 2010

Chocolate Pecan Pie


The weather is cooling down, the leaves are turning yellow/orange… Fall is finally here! Even though, technically, fall started on September 22nd, the past week has finally been fall-like here in Indiana. And you know what? Fall is my FAVORITE season!!! I just love the season change, the crisp air… All I can say is: Yay!
If I think of fall, I think of pies. Yes, I guess I am still a sweet tooth at heart :-) However, I have always been scared of making my own pie dough. There are so many different pie dough recipes out there: which one to make? Butter or shortening? Yes or no to sugar in the crust? So many questions… Well, my goal this season is to find my favorite pie dough recipe and stick with it. I want to be able to have it figured out by Thanksgiving, when I plan on making dessert pies for our family gathering.
While researching for the perfect pie dough, I started with my favorite FoodNetwork chef: Alton Brown. I have his first Good Eats recipe book and tried his recipe for the no-pan pear pie (also online here).  He also explained my question of butter vs. shortening: shortening is a lot easier to work with because it has a melting point higher than body temperature, but butter wins in flavor! So that’s what I used in my recipe too.
For the pie filling part, I tried Emeril Lagasse’s Chocolate Pecan Pie recipe. The filling turned out great! I did not make the caramel sauce in his original recipe, but I’m sure it would taste super yummy with the pie.

So, what was the outcome of the whole pie? Usually I like to display pictures of the foods I make so that people have something to go off of, but this one I could only show the empty pie dish… I entered this pie in a neighborhood pie baking contest and everyone loved it! I did get first place, which I was super excited about. Emeril’s recipe online does have a small picture of his own pie, if you need to see one. I hope to take a picture of this pie in the future when I make it again (and I know I’ll be making it again!).


Chocolate Pecan Pie

Ingredients
1 1/2 cups pecans
1 cup semisweet chocolate chips
1 unbaked 9-inch pie shell (recipe below)
4 eggs, beaten
1/2 cup sugar
1/2 cup light brown sugar
1/2 cup corn syrup
1/2 teaspoon vanilla extract
Pinch salt

Directions
Preheat the oven to 375 degrees F.
Spread the pecan pieces and the chocolate chips evenly on the bottom of the pie shell.
In a mixing bowl, whisk the remaining ingredients together. Pour the filling over the pecans. Bake until the filling sets, 45 to 50 minutes. Remove from the oven and cool for 30 minutes before slicing. Cut into individual servings and serve with a drizzle of Caramel Sauce (optional) and sprinkle with confectioners' sugar.


Pie Crust

Ingredients
12 oz (or 2 ½ cups) AP flour, plus additional for dusting
2 ¼ oz (or ½ cup) cornmeal
1 ½ oz (or 3 Tbsp) sugar
1 tsp salt
2 oz (or ½ stick) unsalted butter, diced at room temperature
6 oz (or 1 ½ stick) unsalted butter, diced, divided and chilled in freezer for at least 10 minutes
½ cup iced apple juice, in spritz bottle

Directions
Pulse the flour, cornmeal, sugar, salt in a food processor to combine. Add the room-temperature butter and pulse until the fat completely disappears into the dry ingredients.
Add half of the chilled butter and pulse 18 times, or until the flour mixture resembles peasized crumbs. Add the rest of the chilled butter and pulse 3 or 4 more times.
Transfer this mixture to a medium-size mixing bowl. Spritz with just enough juice to moisten the surface of the dough. Mix with a spatula. Continue spritzing and mixing until a handful of dough, when squeezed, remains compressed (you may not use all the juice). When you’ve got good adhesion, gather the dough into a round disk, cover with plastic wrap, and refrigerate for 20 minutes so that the flour can absorb the moisture.
Place the dough on a clean floured surface and roll the dough to a ¼ inch-thick disk and place on pie dish. Fill with your favorite pie filling!


Recipes adapted from:
Chocolate Pecan pie filling – Emeril Lagasse
Pie dough recipe – Alton Brown, Good Eats

Monday, September 27, 2010

Red Velvet Cupcakes


Happy Monday everyone! Hope you enjoy the new look to my blog :-)


Back during my pregnancy with my now 14-month old daughter, I had some major cake cravings, especially during the last trimester. I would go to the local grocery’s bakery section and not resist getting a piece of (or a whole) red velvet cake. I loved the moist layered cake with the wonderful cream cheese frosting. If I got a whole cake, I could easily finish it all on my own in less than a week! 
Without realizing, this was the beginning of two of my current loves: baking and red velvet cake. Since then I have been searching for that perfect red velvet cake recipe. For me, a good red velvet cake has these three major qualities: moist, fluffy, and RED! I have come across this recipe recently from one of my favorite food blogs and decided to give the recipe a try. My goodness, did I like it! I got really excited when I started seeing the cupcakes dome up beautifully in the oven, and that is without any baking powder! This cupcake hit all the qualities listed above. I think that my search for the perfect recipe is over, but the countless times I make this recipe is just beginning! 
*One quick note, I modified the frosting recipe just a tad to make it a bit more creamy, although I would try using a colorless vanilla extract next time so the frosting has a nice white shade.

Red Velvet Cupcakes
Yield: about 24 cupcakes

Ingredients:
For the cake:
2½ cups cake flour
1½ cups sugar
1 tsp. baking soda
1 tbsp. cocoa powder
1 tsp. salt
2 large eggs
1½ cups vegetable oil
1 cup buttermilk
2 tbsp. (1 oz.) liquid red food coloring
1 tsp. vanilla extract
1 tsp. distilled white vinegar

For the frosting:
8 oz. cream cheese
8 tbsp. unsalted butter, at room temperature (1 stick)
2 tsp. vanilla extract
1-2 tbsp heavy cream
3½-4 cups confectioners’ sugar, sifted

Directions:
Preheat the oven to 350° F.  Line cupcake pans with paper liners.  In a medium bowl, combine the cake flour, sugar, baking soda, cocoa powder and salt; whisk to blend.  In the bowl of an electric mixer, combine the eggs, vegetable oil, buttermilk, food coloring, vanilla and vinegar.  Beat on medium speed until well blended.  Mix in the dry ingredients on low speed and beat until smooth, about 2 minutes.

Divide the batter evenly between the prepared liners.  Bake, rotating the pans halfway through baking, until a toothpick inserted in the center comes out clean, about 18 minutes.  Let cool in the pans 5-10 minutes, then transfer to a wire rack to cool completely.

To make the frosting, combine the cream cheese and butter in the bowl of an electric mixer.  Beat on medium-high speed until well combined and smooth, about 2-3 minutes.  Mix in the vanilla extract.  Gradually beat in the confectioners’ sugar until totally incorporated, increase the speed and then beat until smooth.  Frost cooled cupcakes as desired.


Adapted from
Annie’s Eats

Sunday, September 26, 2010

Bananamon Crumb Muffins


Hello again! I am trying to play catch up with my recipes, so here is my latest food adventure. At work, we recently had an all-day training session that required all of us to be fully functional at 7:30am. What better way to be up and running than with a nice breakfast muffin? With these yummies, we were able to tackle the training on full force (well, maybe just tackle the training, it was still a Monday hehehe).
The following recipe itself is a blend of 2 recipes I found from one of my favorite food bloggers (Annie’s Eats) and a great recipe I found on Foodbuzz, plus some of my own tweaks. I really like a crumb top layer on certain muffins, so I added it to the recipe. Since I was trying to finish my whole wheat flour, I only had about 1 cup left and ended up using AP flour for the remaining 2 cups. Next time I might just make the muffins with all AP flour instead of mixing, or if you feel like being a little more health conscious, then make it with only whole wheat flour. Hope you enjoy these breakfast treats, as my staff certainly did!

Bananamon Crumb Muffins
Yields 24 muffins

3 cups whole wheat flour (or AP flour)
1 tsp baking soda
1 tsp baking powder
1 tsp cinnamon
1/2 tsp salt
1 1/3 cup sugar
1/2 cup butter, softened (1 stick)
 3 eggs
3 very ripe bananas
1/2 cup nonfat plain yogurt
1 tsp vanilla extract

For the topping:
2/3 cup packed brown sugar
4 tablespoons all-purpose flour
1/4 teaspoon ground cinnamon
2 tablespoon butter   


Preheat the oven to 350 degrees. Line 24 muffin cups.

Measure out the flour with a measuring cup and level with a knife. Mix together the flour, baking soda, baking powder, cinnamon, and salt in a medium bowl.

In a large bowl, beat together the sugar and the butter on medium speed with a mixer until well-incorporated, about 5 minutes. Add the eggs, one at a time, beating after each egg. Add the bananas, yogurt and vanilla extract. Beat together.

On low speed, add the flour mixture in increments. Beat just until blended.

Divide mixture between the muffin cups, about 2/3 full. I use a small sized ice cream scoop for this, which works great!
In a small bowl, mix together brown sugar, 4 tablespoons flour and cinnamon. Cut in the butter until mixture resembles coarse cornmeal. Sprinkle topping over muffins.   
Bake about 15-20 minutes until a toothpick inserted in the center comes out clean.

Adapted from “Life’s Too Short to Eat Fat Free Cheese” Life’s Too Short to Eat Fat Free Cheese” and Annie’s Eats